Introduction to HTML Tutorial for Beginners 2024 Part 1

Photo by Mohammad Rahmani on Unsplash
HTML stands for HyperText Markup Language, and it is the language that powers the World Wide Web.
It was invented in 1990 by Tim Berners-Lee, who envisioned a system of interlinked hypertext documents that would run on the growing global network known as the Internet.
This system became the World Wide Web, and to this day HTML continues to be the language used to represent documents (i.e. web pages) on the Web.
HTML documents are simply text documents that have been marked up with HTML code, giving structure and meaning to the document.
HTML code can be used to define and create HTML elements such as headings, paragraphs, hyperlinks, and images.
Hypertext links are one of the fundamental elements of HTML, allowing pages on the World Wide Web to link to other pages. Hypertext is the ‘HT’ in HTML.
You can do many things with HTML:
- Provide the main text content of a document.
- Give structure to that content with HTML tags.
- Imply extra meaning using those tags.
- Define and create HTML elements like headings, paragraphs, links, and images.
- Provide information to search engines that help them list and categorise your web pages.
All you need to create a HTML document is a computer with a text editor, and a little knowledge of HTML.
Starting with HTML
A HTML document is plain text and may be written in a simple text editor like Microsoft Notepad, TextEdit on Mac, or any of the basic text editors in a Linux installation (Vi, Vim, Nano, etc.).
What separates a HTML document from a regular text document is the mark-up. Mark-up is tags defining HTML elements within the HTML’s text.
What are HTML Elements and Tags?
HTML elements are the building blocks of a web page. These include headings, paragraphs, images, links, and many other possible elements such as those comprising web forms.
An HTML element is defined by tags. All an HTML page consists of is tags and plain text. If you can master tags and you can write, you can easily master HTML.
<p>This is a paragraph.</p>
The above piece of HTML is a paragraph element. By default, it will be displayed on a web page as a self-contained block paragraph of text, with a little bit of spacing above and below.
The p and /p enclosed in pointy brackets are the tags defining the element. The first tag is the opening tag <p>, and the final tag </p> is the closing tag. Enclosed within these two tags are the content, i.e. the text: “This is a paragraph.” This is the text that will be displayed on the final web page.
There are many HTML elements, defining things like paragraphs, headings, links, lists, and images.
Not all elements have opening tags, closing tags, or content. A good example of this is the line break element.
<br />
This creates a line break in the page. It is a single tag with no content, and no closing element. It is called a self-closing tag. Self-closing tags can be identified by the forward slash before the final pointy bracket.
How To Create a HTML File
To create your own HTML file, all you need is a basic text editor. Notepad comes with Windows, TextEdit is preinstalled on Macs, and Vi, Vim, Nano, and many more are available to Linux users for free.
Normally, a text file has a .txt extension (or sometimes no extension). For a browser to recognise a text file as a HTML page, we must change the extension to .htm or .html.
If you are using Windows, then file extensions are hidden by default. To view them:
- Open File Explorer (e.g. by typing it in the search bar).
- Select View from the menu.
- Ensure that “File Name Extensions” is ticked.
If you are using a Mac, then you can view file extensions by doing the following:
- Open Finder.
- Go to the Finder menu at the top of the screen and select Preferences.
- In the preferences window, click on the Advanced tab.
- Ensure “Show all filename extensions” Is ticked.
If you are using Linux, then file name extensions are usually visible by default.
Now if you create a new text file, the extension should be visible, and you can change it to .html by simply renaming the file.
How To Write Your First HTML Page
We learn by doing, so here’s your first exercise as an HTML developer:
You are going to write a web page on a subject of your choosing. If you can’t think of anything else to write about, then write a short autobiography, or a biography on someone you admire. It only needs to be two or three paragraphs, but feel free to go crazy and add as many as you like.
To do this, you’re going to need the basic template for a HTML page.
The Standard HTML Boilerplate Code Template
The minimum code for a basic HTML page that is technically correct looks as follows:
<!DOCTYPE html>
<html>
  <head>
    <title>This is the title.</title>
  </head>
  <body>
    <p>This is a paragraph.</p>
  </body>
</html>
Don’t freak out. It might look complicated, but we’ll break this down so that you can understand it.
The first line is not technically HTML (which is why it doesn’t have a closing tag or forward slash). It is a DOCTYPE declaration that tells your browser to interpret the rest of the document as an HTML page. This should go at the top of all of your HTML pages, exactly as it is written above.
The HTML page itself is an element. Under the DOCTYPE declaration is the opening <html> tag, and it is closed at the end of the code with a </html> tag.
All of the rest of the elements are enclosed within the HTML tags. We refer to this as embedding. The <head> and <body> elements are embedded within the HTML tags, and in turn, other elements are embedded within them.
The <head> element can contain other elements but is not actually displayed on the web page itself. It normally holds data for browsers and search engines. At a bare minimum, it should contain the <title> element. The content of the title element is what is shown as the page title in a user’s browser tab.
After the <head> element is the <body> element. This element contains everything that is displayed in the user’s browser window. In this case, it only contains a single paragraph element with the content, “This is a paragraph.”
So when a web browser reads this page and renders it to the user’s screen, it will display one line of text: This is a paragraph. The title in the user’s browser window will be “This is the title.”
Your First Assignment: Create a Simple Web Page
Now we’re going to put everything we’ve learned together so that you can write your first web page. You will do this by copying the template above to a text file with the extension .html.
Open your HTML file in a text editor. There are three common ways to do this:
- You can open your favourite text editor and open the HTML file from the File menu.
- You can open your favourite text editor and drag the HTML file from your file browser into the text editor window.
- If the HTML filetype is already associated with a text editor, you can just double-click the icon of the HTML file in your file browser, and it will open in the associated text editor.
Once your file is open, change the content within the <title> tags to your own title, and embed your own tags into the <body> element.
You can use as many <p> elements within the <body> element to create as many paragraphs as you like. To give your web page a heading, use the <h1> tag above the <p> elements. Here is an example:
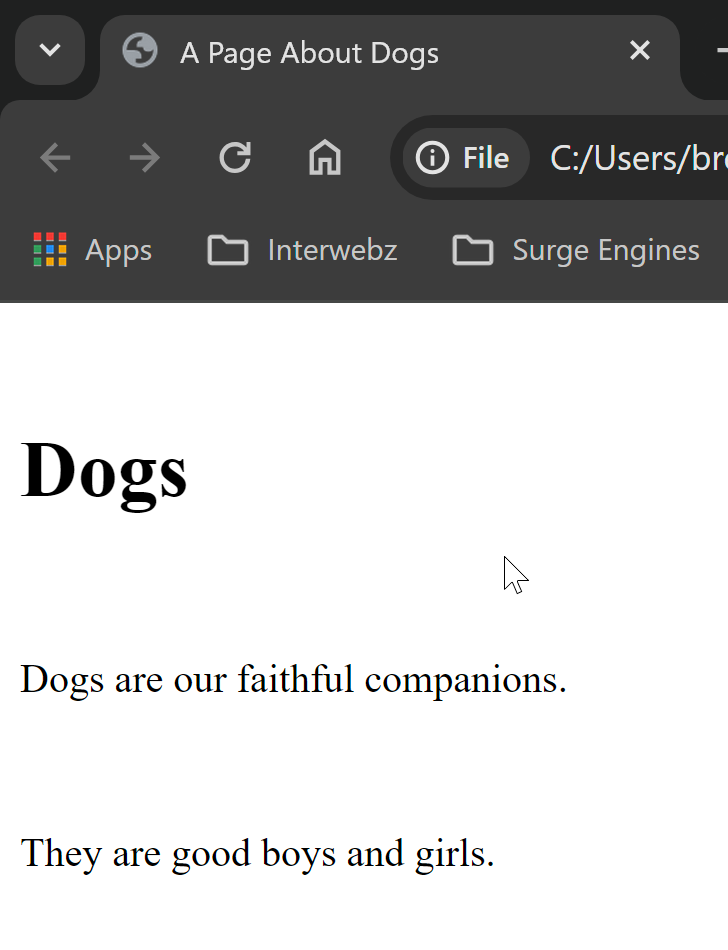
<!DOCTYPE html>
<html>
  <head>
    <title>A Page About Dogs</title>
  </head>
  <body>
    <h1>Dogs</h1>
    <p>Dogs are our faithful companions.</p>
    <p>They are good boys and girls.</p>
  </body>
</html>
When you are finished, open your web page in a web browser to view it. There are three common ways to do this:
- You can open your favourite web browser and open the HTML file from the File menu.
- You can open your favourite web browser and drag the HTML file from your file browser into the web browser window.
- If the HTML filetype is already associated with a web browser, you can just double-click the icon of your web page in your file browser, and it will open in the associated web browser.
Congratulations! You should be looking at your first web page, and it should look something like this:
Correct Indentation of HTML Code
You may have noticed the indentation in the HTML code snippets provided. Each time a new HTML element is embedded within another, it should be placed on a new line, indented one level further to the right than its parent element.
There is a long-standing argument about whether to use tabs or spaces for indentation in the coding world. I personally use two spaces for indentation levels in HTML because it says to do so in the freeCodeCamp course material and it keeps the content readable in a text editor or source view.
If you have an opinion on tabs versus spaces, web development, or this article, then hit me up in the comments of this blog article.
If you want to receive these articles as a free email newsletter then please subscribe to my mailing list.
I wish you all the best in your journey of learning and discovery.